
The Battle of Hatchel Site 22
Warning! This article contains SPOILERS from the novel Divided We Fall by Blaine Pardoe.
This scenario is intended for use either with the BattleTech Tabletop game or MegaMek. All resources can be found at the following link:
[Disclaimer – This article is in no way endorsed by Catalyst Games Lab, Topps or Blaine Pardoe author of Divide We Fall]
Historical Overview
During the Jihad Wolf Dragoons suffered terrible losses at the hands of The Word of Blake and their old enemies the Waco Rangers. After the Wolf Dragoons failed attack on the Word of Blake shipyards on Mars in 3067, a force of Word of Blake backed mercenaries led by Wayne Waco and his Waco Rangers attacked the Wolf Dragon home world of Outreach.
The fierce fighting in the city streets of Outreach’s capital, saw the death of both Wayne Waco and the leader of Wolf Dragoons, Jaime Wolf. The Word of Blake were unable to defeat the Wolf Dragoons with conventional forces, and instead results to plan B NUKES (it’s worth noting that plan B for the Word of Blake is always NUKES!). The survivors of the Word of Blake attack on Outreach were saved from complete destruction by a task force sent by Clan Wolf-in-exile.
In 3072, the remains of Wolf Dragoons fought alongside Adam Steiner against the Word of Blake forces to liberate the Lyran capital of Tharkad but were reduced to a single regiment by the end of the battle.
Wolf’s Dragoons slowly rebuilt over the next 50 years, taking in war orphan’s from the Jihad and using their Iron Wombs. Based out of Arc Royal, the Dragoons engaged in several battles as Clan Jade Falcon raided the Lyran Commonwealth throughout the 3130’s. Forming an alliance with the Spirit Cats, Wolf Dragoons were able to retake their home-world of outreach in 3132
By 3132 Wolf Dragoons had rebuilt to three Regiments: Alpha, Gamma and the Wolf Spiders. During the HPG Blackout the different regiments were scattered across the InnerSphere with no means of communication.
In a surprising turnabout, under the Command of General Thomas Brubaker, Wolf Dragoons accepted a contract to work for the Draconis Combine Warlord Kanrei Toranaga in 3139. The Combine had a strained relationship with the Dragoons after their campaign on Misery during the 4th Succession Wars, but many in the Combine respected the Dragoons for their intervention, alongside Kell’s Hounds, in the Clan Smoke Jaguar and Nova Cat attack on the Draconis capital, Luthein.
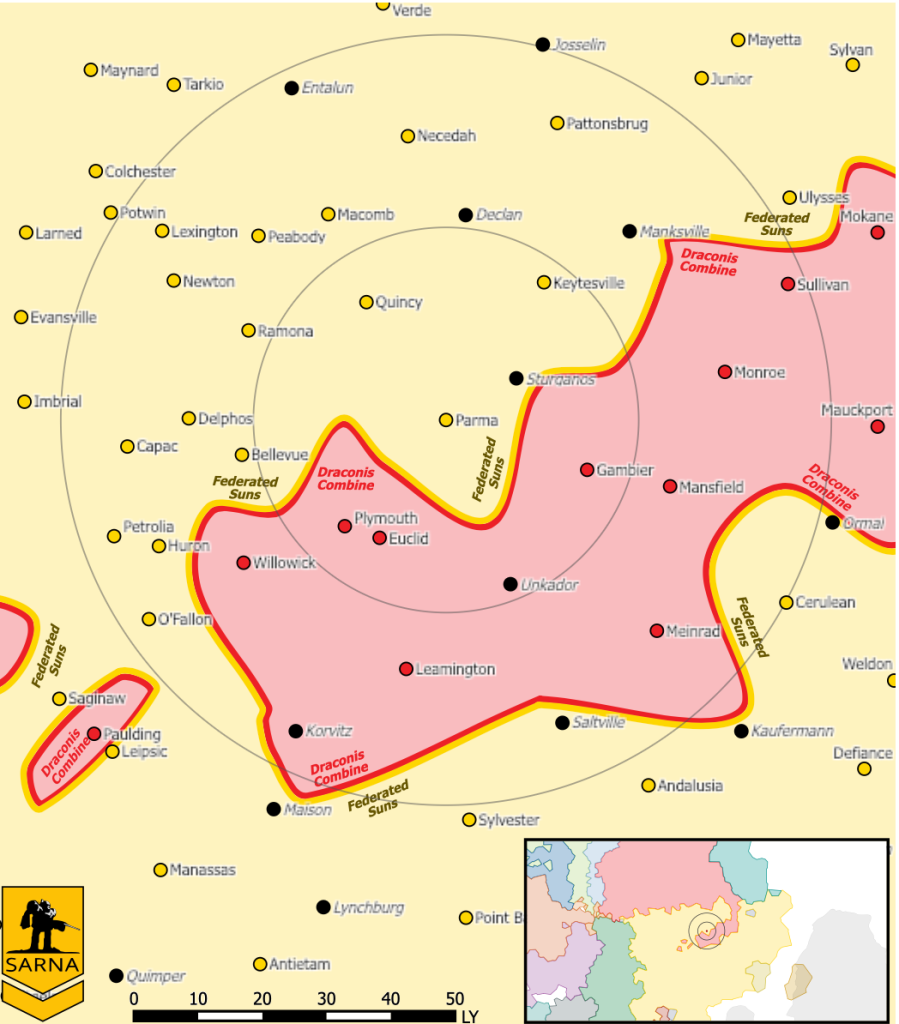
Fighting against the AFFS during Operation PERCEVAL in November of 3149, Alpha Regiment led a daring attack against Coloma, a supply cache for the AFFS defeating the First Avalon Hussars in battle, leading to their surrender. General Brubaker allowed the Hussars to retreat their forces off-world without further conflict, a decision which caused the Dragoons to fall out of favour with Warlord Toranaga. This event, alongside the Combines attempt to rewrite their own history to make it appear the DCMS forces along had defeated the AFFS, led to the Dragoons being side-lined and consigned to garrison duty on a number for Draconis Combine worlds including Parma.
Divided We Fall
On the 25th of November 3150, Clan Wolf warrior, Star Captain Marotta Kerensky arrived on the world of Parma, in the Draconis Combine. He bought with him a stunning and audacious request to the Wolf Dragoons commanding officer, General Thomas Brubaker. Clan Wolf wanted the Dragoons to join with them, not as mercenaries, but as brothers in Clan Wolf. Knowing Brubaker would have no wish to fight for forces of the Republic of the Sphere, Khan Alaric Ward had given Marotta instructions to reassure the Dragoons that they would be used only to engage the forces of Clan Jade Falcon.
“A unique moment in history is approaching. One that will define the future state of mankind. As such, I bring to you a proposal from Khan Alaric Ward. If Clan Jade Falcon becomes the ilClan, they will rain fire down on anyone they perceive to be a threat. Your Dragoons would certainly be high on their list of targets. Malvina Hazen will want blood if she defeats Clan Wolf. She will come for you.”
“My Khan’s proposal is a simple one: Come to Terra. Join with Clan Wolf and fight our common enemy. There will never be a greater opportunity to deliver a killing blow to the Jade Falcons.” – Star Captain Marotta Kerensky
Pardoe, Blaine Lee. BattleTech: Divided We Fall: A BattleTech Novella . Catalyst Game Labs. Kindle Edition.
Some members of the Dragoons were happy to fight against Malvina Hazen’s Falcons and their Mongol doctrine and to seek revenge against them for the death of many Dragoons during action in the Lyran Commonwealth. General Brubaker was however unwilling to endanger the reputation of Wolf Dragoons in fight for a Clan and in breaking their contract with the Draconis.
This led to a rift between the Brubaker and the CO of Gamma Regiment, Colonel Nicholas Crews. Crews decided to take matters into his own hands and made plans to leave Parma, to fight the Falcons. Knowing that General Brubaker wouldn’t let them leave without a fight, Crews forged a plan to lead the Brubaker’s forces to a former stone quarry called Hatchel Site 22. There, he would attempt to ambush the General and take him hostage allowing the renegade Wolf Dragoons, now called the Black Wolf Regiment, to leave the planet without further pursuit by the Dragoons. To help Crews achieve this, Marotta provided the Black Wolf with a force of brand-new Clan Wolf BattleMechs, first intended as a gift to the Dragoons.
This mutiny threatens the one value that Wolf Dragoons holds higher than any other, Unity!
The Battle of Hatchel Site 22
Setup
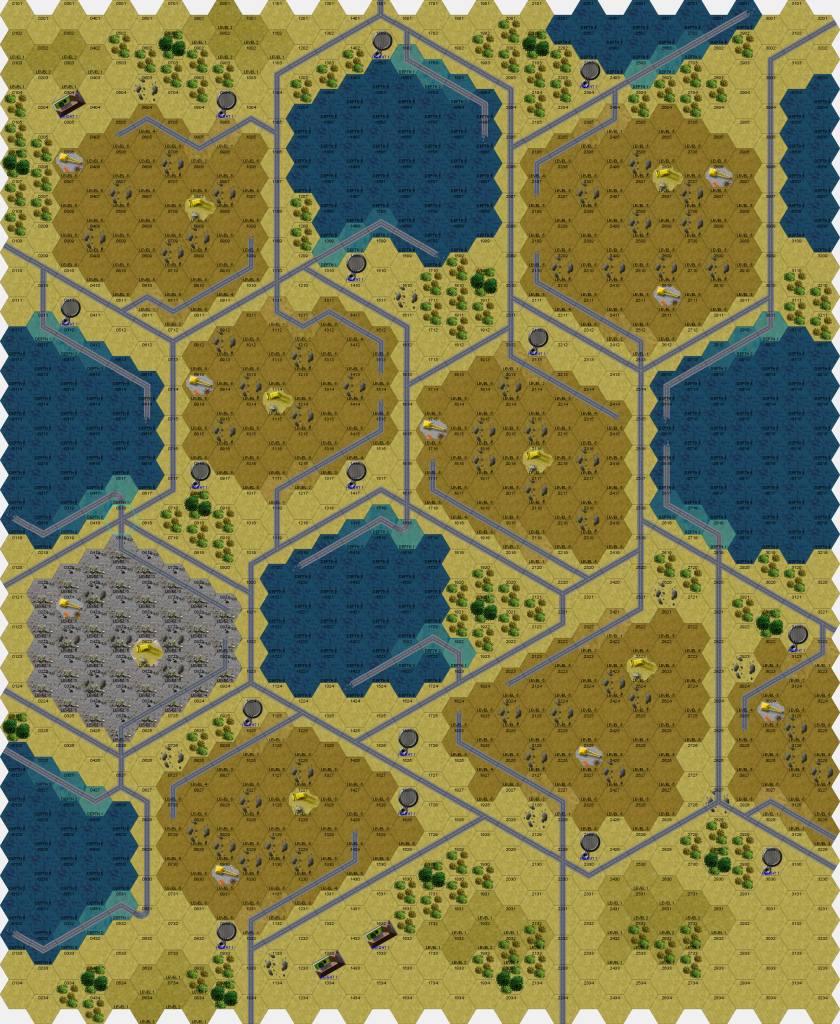
“It’s an old series of stone quarries. Most are filled with water and are very deep. One struck a vein of hot tar and filled up with the stuff. There are narrow high ridges between the quarry pits, with roadways carved to reach the bottoms. They offer a lot of opportunities. It is not ideal ground, but I think we can use it to our advantage. Using the ramp-roadways gives us elevated fields of fire once we lure them in. Moreover, if I was Brubaker, I would rule it out initially because it is not obvious as a defensive position. Tight fighting quarters that would box us in as much as him.” Colonel Nicholas Crews.
Pardoe, Blaine Lee. BattleTech: Divided We Fall: A BattleTech Novella . Catalyst Game Labs. Kindle Edition.
The scenario takes places on 4 map sheets 32×34 hexes. The battlefield consists of series of deep quarry pits. Some are flooded with water and some dry. Each quarry pit has an access ramp allowing mining vehicles and ‘Mechs to descend to the base of the quarry.
Notes for MegaMek setup:
Check the option rules for Double Blind. Set the Black Wolf Company to deploy at the start of the game (select ANY position – but follow the scenario rules). The Black Wolf forces can then deploy in places where they can’t be seen e.g. under water or against the edges of the quarries. Brubaker’s Wolf’s Dragoons should the be set to deploy in the south at the start of turn 1.
Use the above OneDrive link to download the .board map file.
Deployment
All of the Wolf Dragoons forces under the command of General Brubaker enter the map on the first turn from the southern map edge.
The Black Wolf Command Lance can deploy anywhere on the Northern half of the map. Their goal is to draw Brubaker’s forces forward and into one of the quarry pits. The Black Wolf Striker Lance may deploy using hidden deployment in one of the flooded quarries in any of the depth 2 water hexes ready to ambush the Dragoons. The Black Wolf Lockjaw Lance also may deploy in hidden deployment in one of the quarries ready to attack the Dragoon forces from the rear when they pass.
Forces
Wolf Dragoons Alpha Regiment TO&E (BV 33449)
Alpha Lance
Annihilator ANH-2A General Thomas Brubaker (2/3) (CO) 2680 BV
Flashman FLS-8K Cpt Josh McHugh (3/4) 2348 BV
Catapult II CPLT-L7 Lt Felipe Cintron (3/4) 3398 BV
Firestarter FS9-S3 Lt Andrew Sternglass (3/4) 1199 BV
Bravo Lance
Stalker STK-8S Major Skott Whyite (2/3) 3394 BV
Phoenix Hawk PXH-6D Sg Nikki Roche (3/4) 2198 BV
UrbanMech UM-R70 Col. Elizabeth Lyons (2/4) 1115 BV
BattleMaster BLR-K4 Sg Matt Valgardson (3/3) 3214 BV
Charlie Lance
Templar TLR1-OR* Lt Wilma Hakobian (2/3) 4071 BV
War Dog WR-DG-02FC Sg Caesar Pelcham (3/4) 2394 BV
Marauder II MAD-4L* Sg Catharine Keki (3/4) 4071 BV
Mad Cat Mk IV (Savage Wolf) C* Lt Neil Harris (3/4) 3691 BV
Black Wolf Regiment TO&E (BV 33322)
Command Lance
Tundra Wolf 4 Col Nicholas Crews (2/3) (CO) 4827 BV
Goliath C Lt Silvia Schroder (4/5) 2231 BV
Warwolf (Prime) Lt Jazian Weiser (4/5) 2696 BV
Linebacker E Doc Crouch (3/4) 2437BV
Striker Lance
Dominator*** Star Captain Marotta Kerensky (2/3) 5057 BV
Blood Reaper (Standard) Cpt Deborah “Debacle” Sheridan (3/4) 3518 BV
Griffin C SgMg Garry “Gear’ Jackson (4/5) 2131 BV
Mad Cat (Timber Wolf) T** Sg Michael ”Caveman” Barber (4/5) 2516 BV
Lock Jaw Lance
Wulfen A Lt Frey (3/5) 1938 BV
Linebacker D Lt Richard Skelton (4/5) 2021 BV
Pack Hunter II (Standard) Lt Andrew Roy (3/4) 2372 BV
Orion C** Sg Patrick Saul (4/5) 2153 BV
* These ‘Mechs and pilots were not mentioned specifically in Divided We Fall
** These ‘Mechs are custom designed and the MTF can be found in the resource folder. the sheets are also linked below.
*** The Dominator’s design was listed in Divide We Fall. The MTF can be found in the resources folder. The sheet is linked below.
Special Rules
Forced Withdrawal
Once a BattleMech reaches Crippling Damage the pilot will Eject at the start of the next movement phase.
Surrender
Each force will surrender once in reaches 75% losses by number (9/12 Mechs destroyed or Crippled).
Each force will surrender once in reaches 50% losses by number if one of those ‘Mechs is the Commanding Officer (General Brubaker or Colonel Crews) (6/12 ‘Mechs destroyed or Crippled).
Command Initiative
While the CO’s Mech is still active, the force receives a +2 to Initiative.
Objective Points (Maximum 800 OP)
Each enemy Mech destroyed or critically damage (+ 50 OP)
Defeat 75% of ‘Mechs in the opposing force not including the enemy Commanding Officer (+ 50 OP)
Defeat 50% of ‘Mechs in the opposing force including the enemy Commanding Officer (+ 350 OP)
New Units
This is my take on the Griffin C, Goliath C and the Orion C (which is give a brief mention in TRO 3150 pg 223). You can also find the sheet for the Dominator here from Divided We Fall. All MTF files are in the resources folder (linked at the top)
UNITY!

No longer working…
Click to access wolfs-dragoons-all-sheets.pdf
LikeLike
Thanks. Link fixed. Although I had to design the new variants as at the time they hadn’t been released e.g. Timber Wolf T
LikeLike